How to Care for Amaryllis Flower Capably
Growing amaryllis bulbs indoors during the winter is a popular practice among many individuals, although these bulbs have the potential to bloom at other times of the year as well. Amaryllis flowers are usually hybrid varieties derived from different species within the Hippeastrum genus. These species originate from Central and South America and are known for their tropical nature. It’s worth noting that there is a separate Amaryllis genus consisting of only two species that are native to South Africa. However, the amaryllis plants commonly cultivated in the United States do not belong to this particular genus.
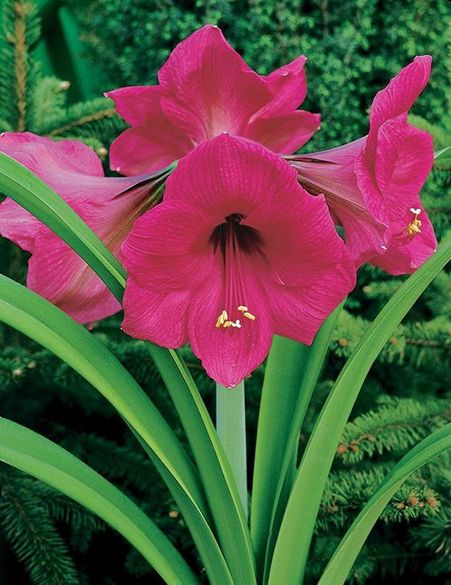
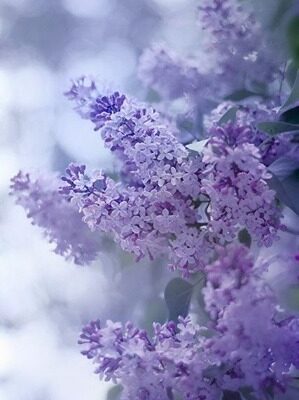
Amaryllis plants possess long, strap-like leaves and produce exceptionally large flowers resembling trumpet lilies. The blooms exhibit a diverse range of colors, including deep red, pink, white, and various combinations thereof. When you cultivate an amaryllis, you can anticipate its flowers to last for a period of seven weeks or potentially even longer. It’s important to be aware that amaryllis contains certain toxic elements in its bulbs, leaves, and stems, which can be harmful to both humans and pets. Care for Amaryllis flowers by providing them with ample sunlight and well-drained soil for optimal growth. Proper care for Amaryllis flowers includes protecting them from common pests and diseases by monitoring for signs and taking timely action.
Common Name: Amaryllis
Botanical Name: Hippeastrum (group)
Family: Amaryllidoideae
Plant Type: Perennial, bulb
Mature Size: 1–2 ft. tall, 9–12 in. wide
Sun Exposure: Full, partial
Soil Type: Well-drained
Soil pH: Acidic, neutral
Bloom Time: Seasonal
Flower Color: Red, pink, white
Hardiness Zones: 8–10 (USDA)
Native Area: Central America, South America
Toxicity: Toxic to people, Toxic to Pets
Care for Amaryllis Flower
The care requirements for amaryllis can differ depending on factors such as whether it is being grown indoors or outdoors, as well as the desired timing of its blooming.
Caring for Indoors Amaryllis
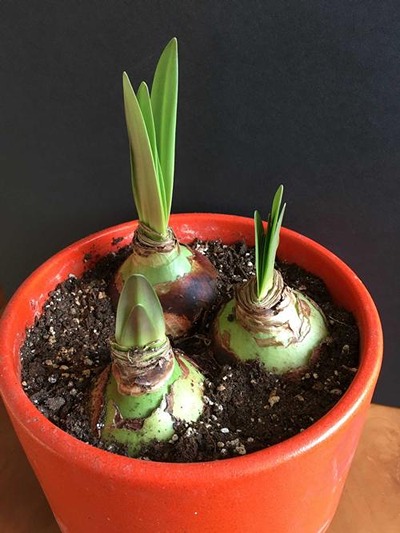
When opting to care for your amaryllis indoors, start by selecting a five- to seven-inch pot and filling it partially with a high-quality sandy loam potting mix that provides proper drainage. Proceed to plant the amaryllis bulb in the pot, ensuring that the top third of the bulb remains exposed when you fill the rest of the pot with potting mix. It is recommended to plant the bulbs approximately 10 to 12 weeks before the desired blooming time.
As you plant the amaryllis bulb, place a bamboo stake alongside it. This precautionary measure is important as the flowers of the amaryllis can be top-heavy. By inserting the stake during planting, you can avoid potential damage to the bulb and its roots in the future.
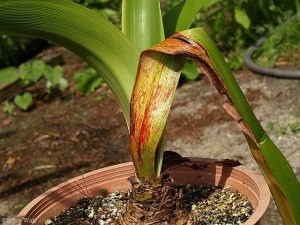
When grown indoors as a potted plant, amaryllis thrives in direct morning sunlight, but it prefers bright indirect light during the afternoon. It is essential to maintain the soil moisture level, ensuring it remains moist but not overly saturated. After a few weeks of planting, you can expect a sturdy flower stalk to emerge from the bulb. Subsequently, the flat leaves will begin to grow as the flower stalk matures.
To promote even growth and straight development of the flower stalk, it is advisable to rotate the pot every few days. This practice ensures that the flower stalk receives uniform exposure to sunlight from all sides, resulting in optimal growth.

Care in Fall and Winter
Many individuals choose to purchase amaryllis bulbs during the fall season with the intention of potting them and enjoying their blooms during the winter holidays. If you are following this practice, the steps for setting up the bulbs for spring planting can be applied in this case as well. However, if you are involved in year-round amaryllis care, there are specific steps you can take after the flowering period to encourage winter blooms once again.
Once your amaryllis has finished blooming, it is recommended to trim back the flower stalk while allowing the foliage to continue growing. If desired, you can opt to move your plant outdoors during the summer months, ensuring it is placed in a location that receives partial shade. When it comes to watering your amaryllis, it is important to do so whenever the top two inches of soil become dry. Additionally, providing regular nourishment is essential, and you can achieve this by feeding your amaryllis with a half-strength water-soluble fertilizer every two to three weeks.
In August, it is important to discontinue feeding your amaryllis plant and bring it indoors. During this time, you may notice that the foliage of the plant is deteriorating, but it is crucial to ensure that the plant is never exposed to frost. If you observe any fully depreciated leaves on the plant, it is recommended to trim them back. At this stage, it is necessary to subject your amaryllis to dark conditions. Move the plant to a cool indoor location, ideally with temperatures ranging from 55 to 60 degrees Fahrenheit, and ensure that the spot is dry and devoid of any light. Additionally, it is advised to stop watering the plant either at this point or 10 to 12 weeks before the desired blooming time (if targeting the winter holiday season).
The absence of foliage and reduced watering will trigger the amaryllis to initiate another flower stalk. At this point, you can resume watering the plant and relocate it to a warm and sunny indoor spot. Subsequently, new leaves will emerge, followed by the blossoming of the amaryllis flowers. After the flowering period, it is essential to refrain from feeding the plant for a period of eight to ten weeks. This withholding of nutrients will induce a dormant phase necessary for the bulbs to reset and prepare for future growth cycles.
Outdoor Care for Amaryllis
In regions classified as USDA hardiness zones 8 to 10, it is feasible to cultivate amaryllis outdoors. For successful growth, it is essential to plant the bulbs in soil that is well-drained and fertile. The bulbs can be planted when the soil temperature reaches 70 degrees Fahrenheit or higher. Since amaryllis is a tropical plant, it thrives in warm temperatures. While it can tolerate full sun to partial shade conditions, providing bright shade is considered the optimal outdoor environment for its growth.
If your area is free from frost throughout the year, it is recommended to plant the amaryllis bulbs with their necks at or slightly above ground level. However, in regions where frost is a possibility, it is advisable to plant the bulbs with approximately five to six inches of soil covering them, followed by an additional layer of five to six inches of mulch. After planting, ensure thorough watering, but subsequently, only water when the top two inches of soil become dry.
Types of Amaryllis
Amaryllis, known for their vibrant and captivating blooms, come in a diverse range of varieties. When selecting an amaryllis, the primary factor to consider is the color of the flowers. Here is an assortment of recommended amaryllis varieties, along with additional data:
- Samba: This particular variety showcases striking ruffled blooms in a rich shade of red, adorned with elegant white markings. The blooms are notably large, creating an eye-catching display.
- Apple Blossom: This popular amaryllis variety features exquisite blooms with an enchanting blend of pink and white hues. The flowers exhibit a captivating contrast, and their throats exhibit hints of green. It is a widely favored choice among enthusiasts.
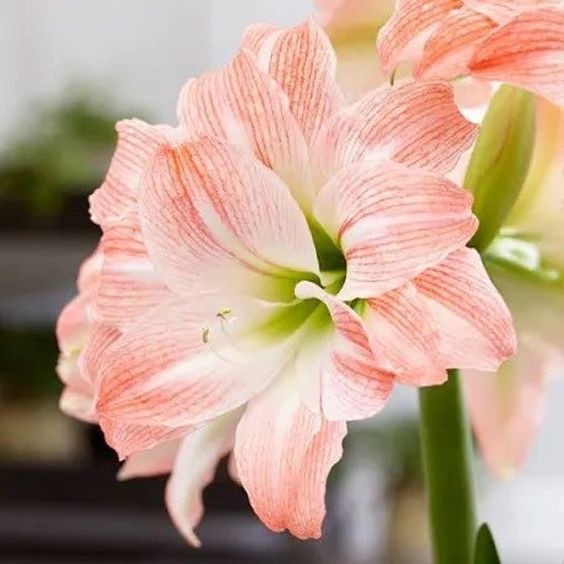
- Faro: With delicate and charming flowers, ‘Faro’ stands out with its pale salmon and white blooms. In comparison to most amaryllis varieties, the flowers of ‘Faro’ are smaller and possess a more delicate appearance. Its understated elegance adds a touch of grace to any setting.
- Summertime: Offering a distinctive and alluring color palette, the ‘Summertime’ variety boasts large blooms that span an impressive seven inches in diameter. The flowers showcase a captivating range of hues, ranging from watermelon pink to a deep rose shade. Adding to its allure, the centers of the blooms exhibit a subtle greenish tint.
- Matterhorn: For those seeking a classic and timeless choice, ‘Matterhorn’ presents a pristine option. This variety features pure white blooms with a gentle hint of yellow-green in their throats. Its elegance and simplicity make it a versatile choice for various occasions and settings.
Pruning and Summer Maintenance
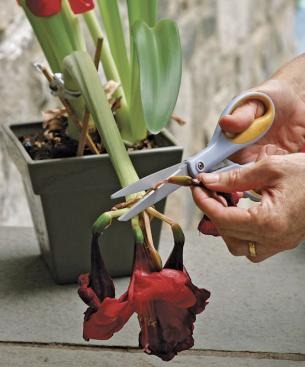
After the amaryllis flowers have completed their blooming cycle, it is important to engage in proper pruning techniques to promote the plant’s overall health and prepare it for its dormant phase. Here are some detailed guidelines for pruning your amaryllis, along with additional tips for its summer maintenance:
1. Pruning the Flower Stalk:
Once the vibrant blooms have faded, carefully trim the flower stalk, ensuring you cut it just above the bulb. This step helps redirect the plant’s energy towards bulb development and encourages future growth and flowering. Be cautious not to damage the bulb while trimming the stalk.
2. Watering during Dormancy:
While the amaryllis transitions into its dormant phase in the fall, continue providing it with regular watering until the foliage begins to die back naturally. Adequate watering during this period allows the plant to store essential nutrients in its bulb, facilitating healthy growth in subsequent seasons.
3. Outdoor Summer Placement:
To further support the amaryllis’s growth and vitality, consider relocating it outdoors for the summer months. Find a suitable spot with partial shade, as this will shield the plant from excessive sunlight exposure, which can lead to leaf scorching. Ensure the outdoor location offers well-drained soil to prevent waterlogging, as excessive moisture can be detrimental to the bulb.
4. Monitor Environmental Conditions:
While the amaryllis enjoys its summer hiatus outdoors, keep a close eye on the surrounding environmental factors. Check for signs of pests or diseases, such as aphids or fungal infections, and take appropriate measures to address any issues promptly. Additionally, adjust watering frequency based on weather conditions, striving to maintain a consistent level of soil moisture without overwatering.
5. Prepare for Fall Transition:
Towards the end of summer, as the days grow shorter, start preparing your amaryllis for its transition back indoors. Gradually reduce watering to allow the foliage to naturally wither and die back. This process signals the plant’s readiness for a dormant period, during which it will require minimal care until its next growth cycle begins.
Propagation Techniques
Amaryllis bulbs have a remarkable ability to multiply, producing small side bulbs known as bulbils, similar to the way daffodils propagate. If you desire to expand your collection of these stunning plants, you can propagate them by carefully removing and potting these bulbils once the parent plant enters its dormant phase and the blooms have faded. This process typically occurs in late winter to early spring for outdoor plants, while indoor plants enter dormancy in the fall. Patience is required as bulbils usually take a few seasons to mature and produce flowers. Here’s a detailed guide on how to propagate amaryllis:
1. Gently Remove the Parent Plant:
Using a spade, delicately lift the entire amaryllis plant from its flower bed or container. Take care not to damage the bulb or any roots during this process.
2. Clear Soil and Separate the Bulbils:
Remove the soil surrounding the bulb and any attached roots. To separate the bulbils from the parent bulb, gently twist them away. If they do not detach easily, you may use a knife to carefully split them apart. Ensure that the bulbils retain their roots and avoid taking any small bulbils from the parent bulb.
3. Replant the Parent Bulb:
Return the parent bulb to its original spot in the garden bed or container, ensuring it is positioned correctly for optimal growth.
4. Potting the Bulbils:
Prepare containers with rich potting soil. Place the bulbils in the containers, leaving approximately one-third of the top of each bulb visible above the soil surface. Ensure the container provides ample space, allowing at least two inches of clearance between the bulb and the container’s sides.
5. Optimal Placement and Care:
Indoor Placement: Position the containers in a sunny location indoors, ensuring the bulbils receive sufficient sunlight. Water the soil regularly to maintain moisture levels, ensuring it remains consistently moist without becoming overly saturated. Expect to observe new growth emerging from the bulbils within three to four weeks.
Overwintering Techniques
Depending on your USDA hardiness zone, different approaches are recommended for the winter care of amaryllis plants. Ensuring their survival and promoting healthy growth in subsequent seasons can be achieved through specific overwintering methods. Here’s a detailed guide on overwintering amaryllis, tailored to various hardiness zones:
Zone 8 to 10:
If you reside in USDA hardiness zones 8 to 10, amaryllis plants can generally withstand the winter conditions without any special care. These zones typically provide a sufficiently mild climate for the plants to thrive, allowing them to remain in their current location.
Zone 7:
In USDA hardiness zone 7, where winters can be more challenging, it is recommended to overwinter amaryllis plants in the garden. To accomplish this, apply a thick layer of mulch around the plants. The mulch acts as insulation, protecting the bulbs from freezing temperatures. Ensure the mulch covers the soil around the base of the plants and extends several inches beyond the foliage.
Other Zones:
For regions outside of zones 7 to 10, it is advisable to store the amaryllis bulbs for the winter to safeguard their health and vigor. Follow these steps for proper bulb storage:
- Carefully Remove the Bulb: Lift the amaryllis bulb from the garden bed, taking care not to damage the roots.
- Choose an Ideal Storage Spot: Find a cool, dry, and dark location for storing the bulbs during the winter months. Ideally, the temperature should remain between 40°F (4°C) and 50°F (10°C). Suitable storage options include a basement, garage, or cellar.
- Prepare the Bulbs: Gently brush off any excess soil from the bulb, being cautious not to remove the protective outer layers. These layers help retain moisture and provide essential nutrients for future growth.
- Select a Storage Container: Place the bulbs in a breathable container, such as a mesh bag or paper bag. Avoid using airtight containers, as they can promote excessive moisture buildup and lead to rot.
- Monitor and Maintain: Regularly check the bulbs throughout the winter, ensuring they remain firm and free from signs of decay or mold. If necessary, lightly mist the bulb or the storage medium to maintain adequate moisture levels.
Protecting Amaryllis Plants
Cultivating healthy amaryllis plants involves not only providing proper care but also staying vigilant against common pests and diseases that can affect their well-being. By being aware of these potential issues and taking appropriate measures, you can safeguard your plants and promote their optimal growth. Here’s an in-depth overview of common pests and diseases that may impact amaryllis, along with recommended actions:
Pests:
- Spider Mites and Mealybugs: Be watchful for spider mites and mealybugs, as they can pose a threat to amaryllis plants. If an infestation occurs, treating the affected plants with horticultural oil can be an effective solution. Horticultural oil suffocates and kills the pests without harming the plant. Regular inspection and early intervention are crucial to prevent severe infestations.
- Slugs and Snails: When amaryllis plants are grown outdoors, slugs and snails may feast upon them. These pests are particularly attracted to the tender foliage and flowers. Employing organic slug and snail control methods, such as using copper barriers or introducing beneficial predators like nematodes or ducks, can help protect the plants from damage.
Diseases:
- Red Blotch: Red blotch is a fungal disease that spreads rapidly among amaryllis bulbs. It manifests as reddish-brown spots on the leaves, bulb, and scape. To prevent the spread of red blotch, it is essential to promptly remove and destroy any infected plants or bulbs. Practicing good sanitation, such as cleaning tools and containers thoroughly, can also help prevent the disease from spreading.
- Mosaic Virus: Amaryllis plants can also become infected with mosaic virus, resulting in reduced blooming and growth. Affected leaves exhibit yellow streaking. Unfortunately, there is no known cure for mosaic virus, and infected plants cannot be salvaged. It is crucial to remove and discard any plants showing signs of the virus to prevent its spread to healthy plants.
Regularly monitoring your amaryllis plants, both indoors and outdoors, enables early detection of pests and diseases. Prompt action, such as implementing appropriate pest control measures or removing infected plants, helps protect the overall health of your amaryllis collection. Additionally, practicing good gardening practices, including proper sanitation and providing optimal growing conditions, can minimize the risk of pests and diseases.
Achieving Spectacular Amaryllis Blooms
Captivating with their vibrant blossoms, amaryllis plants are a favorite among gardeners and indoor plant enthusiasts alike. To ensure a successful bloom, understanding the specific requirements and timing for planting and care is essential. Here’s a comprehensive guide on how to get your amaryllis to bloom, including additional insights:
Frost-Free Gardens (USDA Hardiness Zones 8 to 10):
In regions with mild winters, amaryllis plants naturally bloom in the spring months of March, April, and May, with the possibility of a fall rebloom. These zones provide the optimal conditions for the plant’s growth and flowering.
Potted Plants for Holiday Bloom:
Many individuals purchase amaryllis bulbs as potted plants specifically for holiday blooms. To achieve this, precise timing is crucial. Dormant bulbs acquired from growers for holiday blooming should be stored in a cool, dark, and dry location until the appropriate planting time. The bulbs need to be planted approximately 10 to 12 weeks before the desired bloom time to ensure proper development.
Reblooming Potted Amaryllis:
If you already have potted amaryllis plants and wish to encourage reblooming, a controlled approach can be employed:
- Outdoor Summer Growth: During the summer months, place the potted amaryllis outdoors, allowing it to grow and flourish. Exposure to natural sunlight and optimal growing conditions during this period promotes bulb development for future blooms.
- Inducing Dormancy: To initiate a rebloom, bring the plant indoors and trigger a short period of dormancy. Achieve this by withholding water and fertilizer for several weeks, providing the plant with a resting phase. This period mimics the natural growth cycle of amaryllis, setting the stage for a successful rebloom.
- Restarting the Bulbs: After the dormancy period, resume regular watering and fertilization, and provide adequate light to stimulate new growth. With proper care and nurturing, the amaryllis bulbs will soon produce another spectacular bloom.
Factors Affecting Bloom:
Lack of blooming in amaryllis plants can often be attributed to two primary factors:
- Insufficient Rest Period: If the plant did not undergo a proper rest period following the last bloom, it may struggle to produce subsequent flowers. Ensure the plant has a dormant phase with reduced watering and fertilization to allow for rejuvenation.
- Inadequate Light: Amaryllis plants require abundant light to thrive and bloom. Insufficient light exposure may hinder their ability to produce flowers. Place the plant in a well-lit location, ideally near a sunny window or under artificial grow lights, to promote robust growth and blooming.